Trying HunyuanVideo in ComfyUI – The First Run
I finally got around to testing HunyuanVideo in ComfyUI, and let’s just say the first attempt wasn’t exactly what I hoped for. The output looked kinda soft, almost like someone smeared Vaseline on the lens. Meanwhile, the same prompt on Hunyuan’s own site spat out something way sharper. That got me thinking—maybe I missed something in the setup.
Upscaling Made a Difference
Turns out, running the raw output through an upscaler helped a ton. I just loaded the ComfyUI-generated video into the upscale node, set it to 2x with the 4x Pool Hard Model, and the difference was night and day. it actually looked like a proper video instead of a blurry mess.
After some trial and error, these settings gave me the best balance between quality and performance:
Resolution: Stuck with 512×512—anything higher tanked my VRAM.
Steps: 30 worked fine, but going higher didn’t seem to improve much.
Guidance Scale: 6 kept things aligned with the prompt without going overboard.
BF16 Mode: Enabled for faster processing (and to avoid crashing).
For video settings, I left the bitrate at 64 kbps and dropped the frame rate to 16 fps. Not cinematic, but smooth enough for most uses.
When Things Break
Hit a “device allocation failed” error midway through one run. Canceling, waiting a few seconds, and retrying usually fixed it. Annoying, but not a dealbreaker.
Manual Downloads (Because Auto-Downloads Hate Me)
Had to grab a few files manually:
Transformer/VAE: Grab It Here Link : https://huggingface.co/Kijai/HunyuanVideo_comfy/tree/main The hunyuan_video_720_cfgdistill_fp8_e4m and hunyuan_video_vae_bf16.safetensors files from Hugging Face. Dropped them in the UNET and VAE folders, respectively.
Text Encoders: Cloned the llava-llama-3-8b and clip-vit-large-patch14 repos into the LLM and CLIP folders. ComfyUI’s auto-downloader should handle these, but mine decided to take the day off.
VRAM Tips
Even with 12GB, you’ll hit limits if you push the resolution too high. Lower res still works, though—just don’t expect 4K.Trying Out ComfyUI OmniGen for AI Image Editing
Here’s the thing—I’ve been testing OmniGen in ComfyUI for the past week, and it’s one of those tools that makes you wonder how you worked without it.
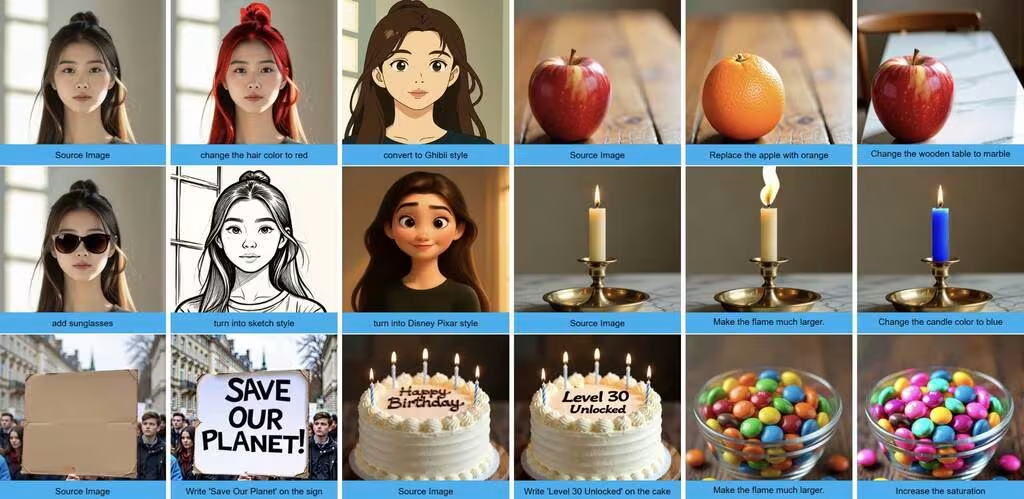
I didn’t expect the object removal to work as smoothly as it does. You just mask what you want gone, and it handles the rest without leaving weird artifacts. The inpainting is solid too—way better than some of the other options I’ve tried.
https://huggingface.co/Kijai/llava-llama-3-8b-text-encoder-tokenizer
Getting OmniGen Running
First, I had to grab the custom nodes from the ComfyUI Manager. The main OmniGen node installed fine, but I also needed the “Text to Prompt” node for full functionality. The whole setup took maybe five minutes, including a quick restart.
For the HF Transfer error, the fix was straightforward—just ran pip install hf_transfer in the ComfyUI Python folder and restarted. Annoying, but not a dealbreaker.
git clone https://huggingface.co/Kijai/llava-llama-3-8b-text-encoder-tokenizerDialing In the Settings
The default settings work, but I got better results after tweaking:
Steps at 50 for cleaner details
Guidance scale around 1.6-2.5 depending on how much I wanted the prompt to steer things
Kept “Store in VRAM” enabled—slower but more stable
The resolution toggle is handy. I mostly stuck with input size matching to avoid weird scaling, but 1024×1024 looks great if your GPU can handle it (my 3090 was fine, but I’d be careful on cards with less VRAM).
Where It Shines
The real surprise was how well it handles composite edits. I fed it a messy product shot with a cluttered background, and after masking the subject, it generated a clean studio-style backdrop in one pass. No manual cleanup needed.
git clone https://huggingface.co/openai/clip-vit-large-patch14For quick fixes—removing photobombers, swapping colors, sharpening blurry areas—it’s stupidly fast. Not perfect, but way better than most single-purpose tools.
If you’re already using ComfyUI, it’s worth dropping into your workflow. The GitHub repo has the node links if you want to try it yourself. Just don’t expect Photoshop-level precision yet—this is more about speed and convenience than pixel-perfect control.

