


I’ve been testing this new AI model called Hidream E1, and it’s like having ChatGPT’s image editing but running right on your own computer. It’s not as powerful as the cloud versions, but let me show you what it can do—change parts of an image, tweak styles, replace text, or even remove objects, all with simple text instructions.
Getting Hidream E1 Running in ComfyUI
There are a few ways to try Hidream E1, like using their Gradio interface or Hugging Face Spaces if your GPU isn’t strong enough.
Even with the smaller GGUF files, you’ll still need about 16GB of VRAM to run it smoothly. Today, I’m using ComfyUI to test it out. If you’re new to ComfyUI or Hydream, check my previous videos for setup help—links are in the description.
Setting Up the Workflow
First, grab the free ComfyUI Hidream workflow. You can either download the image and load it through the workflow menu or just drag it straight into ComfyUI. If you’ve used Hidream before, most files will already be there, but you’ll need the new Hydream E1 model. (Grab it From here)
- hidream_i1_fast_bf16.safetensors
- GGUF files: https://huggingface.co/ND911/HiDream_e1_full_bf16-ggufs/tree/main
The new model loads in the diffusion model node, with the rest of the setup matching my older Hydream videos. The full model is slower because it uses negative conditioning, thanks to the CFG being above 1. The prompt here is pretty detailed—something like “let the woman put on VR glasses full of tech vibes” and a bunch of other specifics.
One thing to note: this version has a resolution limit. I got 768×1152 to work sometimes, but most of the time, you’ll want to stick with a square 768×768 image. Not ideal, but it is what it is for now.
Testing Hydream E1’s Capabilities
The custom sampler uses Instruct Pix2Pix conditioning and a dual CFG guider, which means you’re dealing with three sets of conditioning. At default settings, I was getting about 4.3 iterations per second, taking around 2 minutes to generate an image on my RTX 3090, using a hefty 22GB of VRAM.
First Results
The output looks solid for the prompt, but let’s see if we can speed things up. Dropping the steps from 28 to 20 shaved off 30 seconds, bringing it down to 1.5 minutes. The quality? Still pretty good.
Pushing the Limits
Next, I swapped the input image but kept the same prompt—a house this time—and… well, it didn’t change much. Shows how important matching your prompt to the image is.
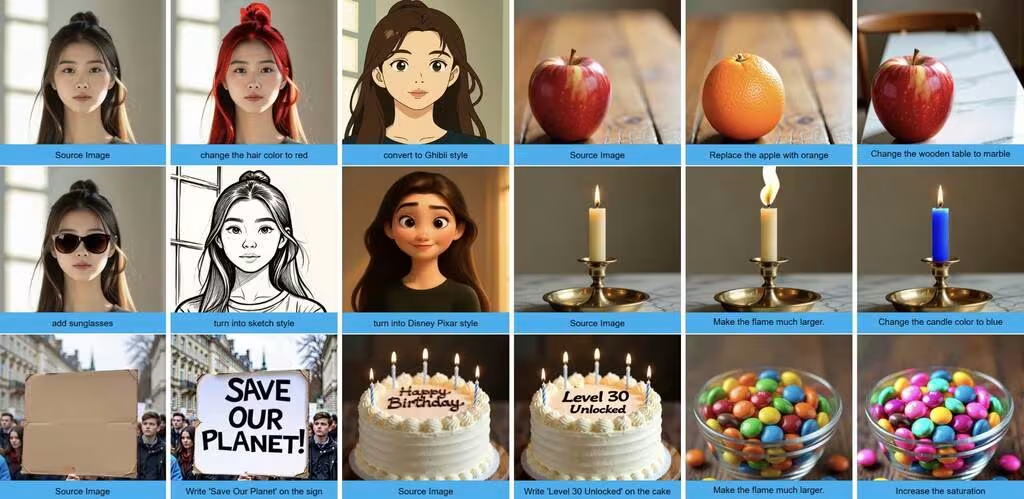
Then I tried a new prompt inspired by their examples: turning the image into an anime-style cartoon. The result? Not bad, but it missed the glasses and gave the guy a weirdly chibi head. Close, but not perfect. Tweaking the prompt to include glasses and fix the head shape helped a bit, but the eyes ended up green instead of glasses. Still, it’s progress.
Style Matching and Object Removal
It works with all sorts of input images. I threw in an anime-style pic and prompted, “Give him a mustache.” The style stayed consistent, and the mustache looked great. Then I tried something wild: “Change the rodent to an origami-style folded paper.” The original was a rodent watching TV, and in 14 steps, it turned into a paper version. Love it.
It handles object removal well too. I prompted, “Erase the lamp post on the left,” and it was gone—no manual masking needed.
Optimizing for Speed
Now, let’s tweak the workflow for faster results. I stripped out some nodes, swapped in a regular K sampler, and adjusted the settings: 8-20 steps, CFG at 2.5, and UniPC sampler. That cut the time down to about 30 seconds per image.
Upscaling Quirks
One thing I noticed—the upscale method matters. Using bicubic kept the trees looking sharp, while bilinear messed them up. So, depending on your input, you might need to tweak this.
Final Thoughts
Hidream E1 isn’t perfect, but it’s a solid step forward for local AI image editing. The speed trade-offs are worth it if you need quick, text-driven edits without jumping to cloud tools. For more details on setup, check out the official Hydream documentation or my ComfyUI workflow guide.